Project 03 · Case study
A Consumer Product, Taken to Mass Production
Hand-built, each unit cost $46.55; the mass-production plan — 4 priced tools, fully burdened costs — lands the same design at $3.90 a unit.
BU ME 537 is a mass-production class: pick a consumer product in January, then carry one design through the full gate sequence — concept selection, EVT with 1 unit in early March, DVT in mid-March, PVT with 10 units in mid-April, and a mass-production plan ramping 100, 500, and 1,000 units by October. I did it with Team 7 — three teammates and me, supervised by our professor. The plan we finished with is the part I would put in front of a manufacturing engineer first: 4 tools specified and priced — a $6,500 injection mold for the mount, a $5,500 mold for the base, a $3,500 stamp-cut die and a $2,000 bending die for the key — with fully burdened per-part costs and a supplier table carrying MOQs and lead times.
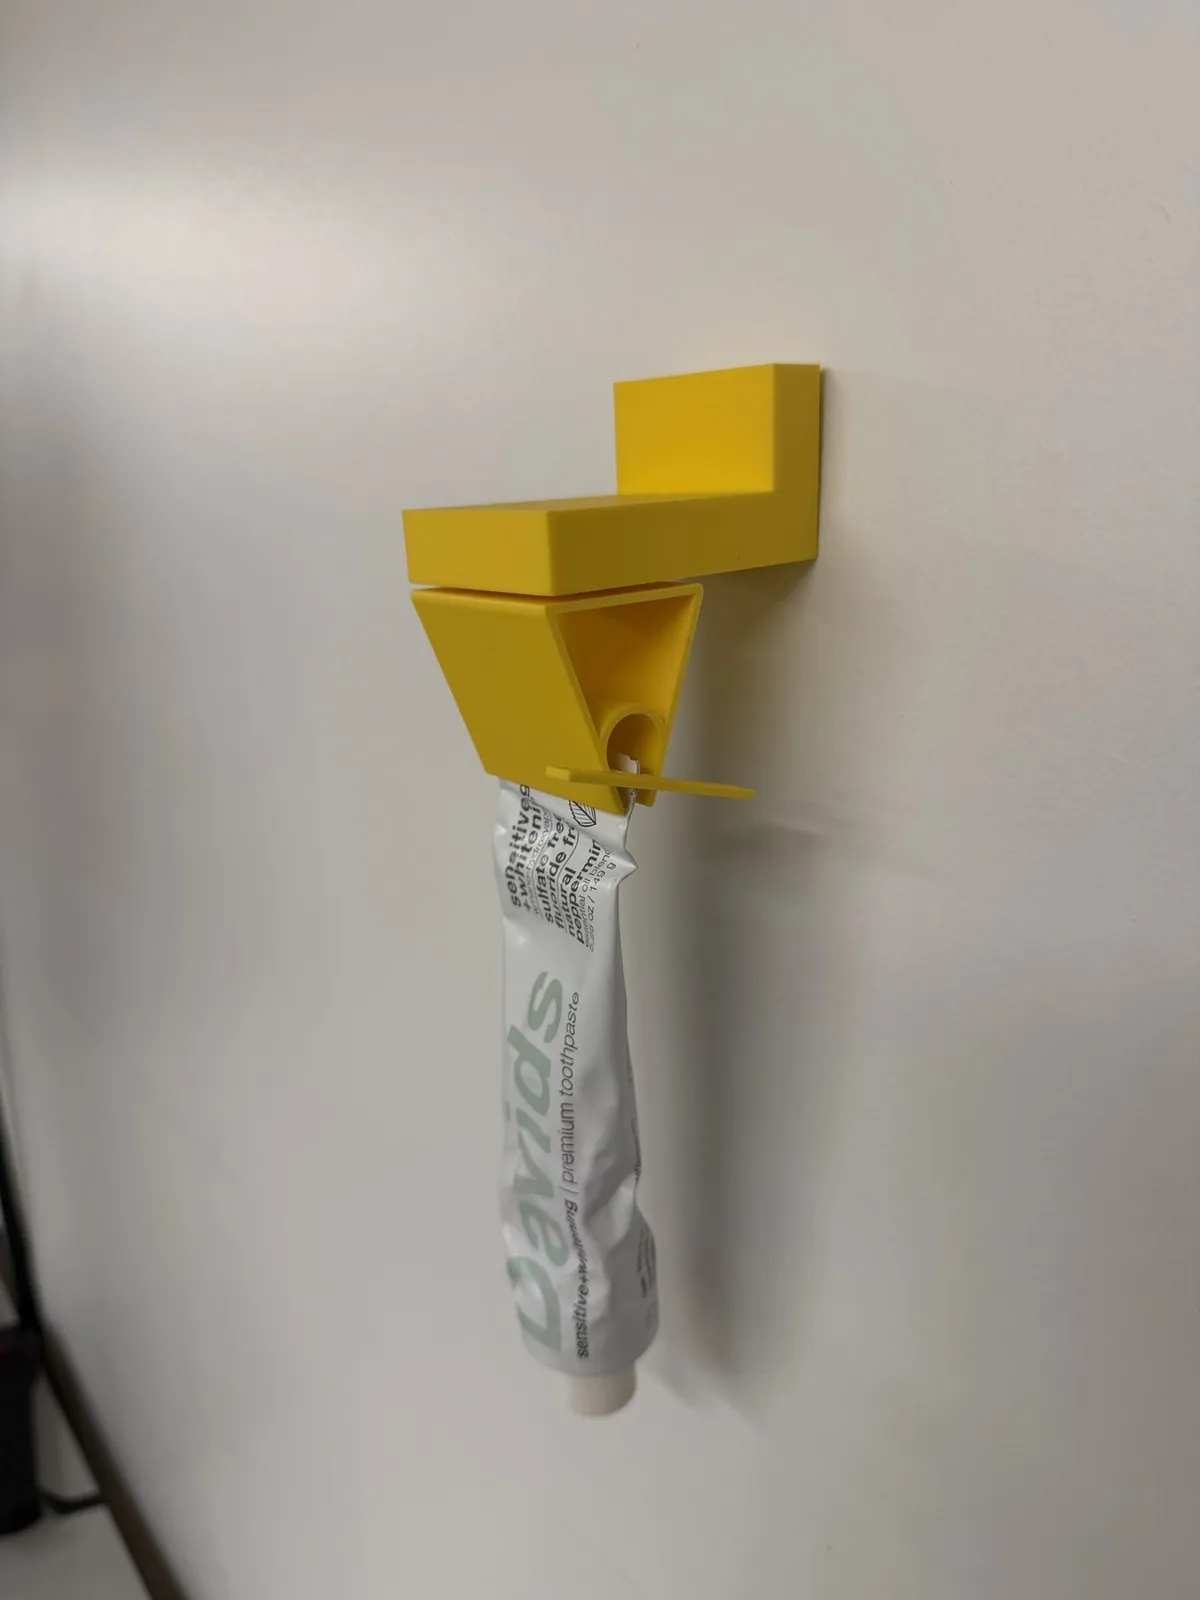
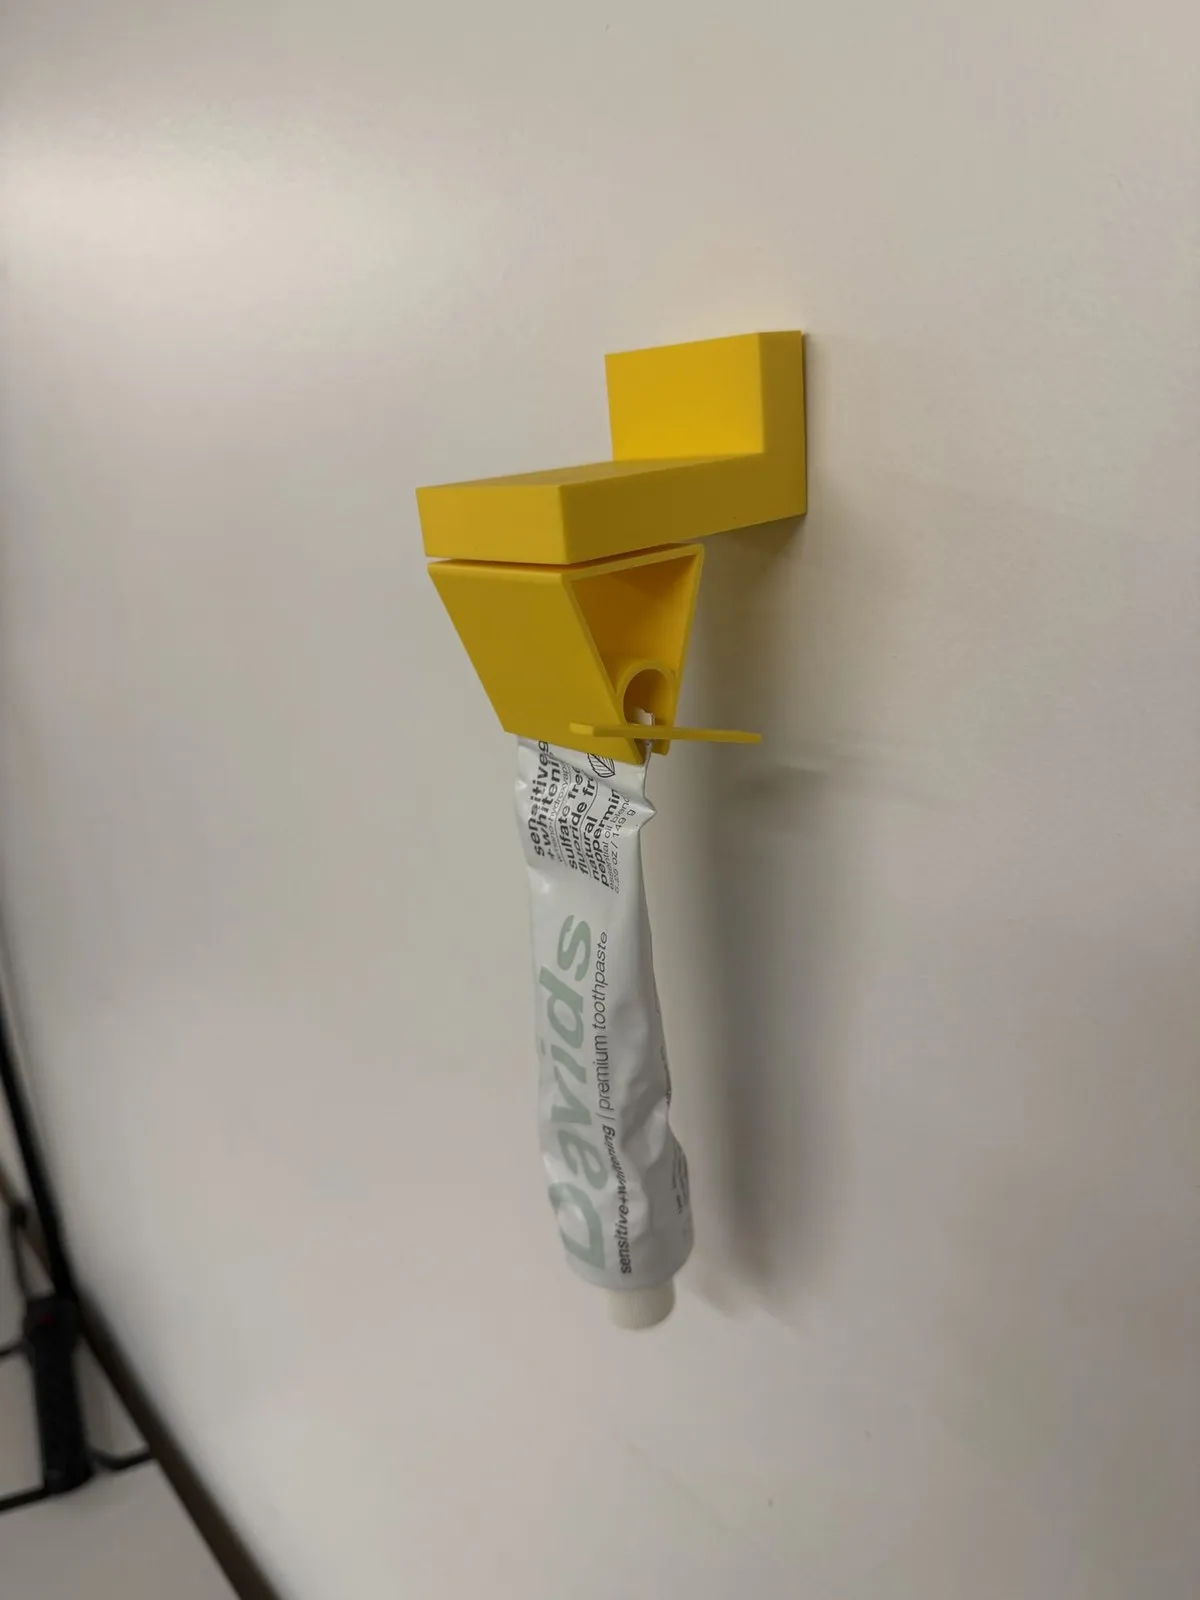
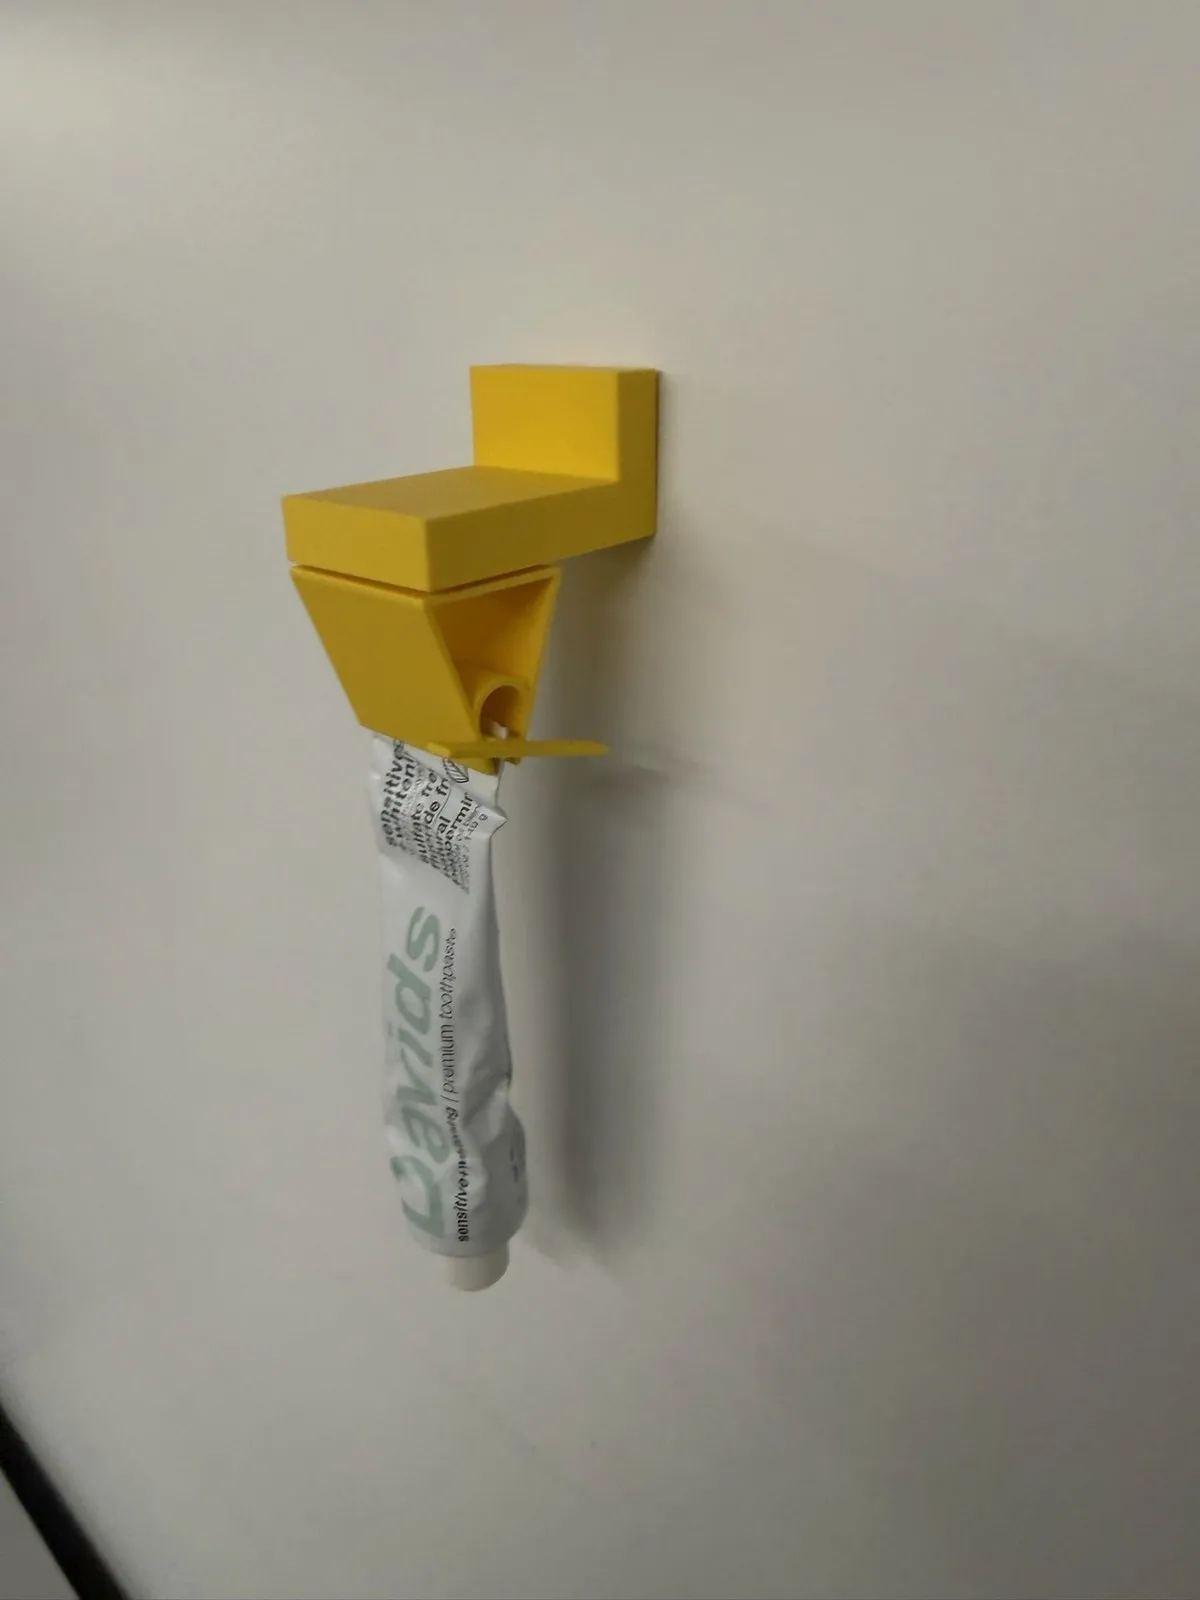
The product was a wall-mounted toothpaste dispenser. The mount sticks to the wall, the tube slides into a slot in a metal turn key, and rotating the key winds the tube up, squeezing paste out until the tube is actually empty; the base slides off the mount for travel. People with movement issues can’t squeeze a tube easily, plenty of people just want every last drop out of the one they paid for, and there is the appeal of a slightly luxurious bathroom accessory. The budget, I believe, was around a couple hundred dollars, and every prototype was built in-house at BU: the EPIC mill, the EPIC waterjet, the RASTIC 3D printer, bench work in B05.
Who did what: the parts I owned heavily were the wall mount and the key — the mount design with its dovetail joints and the folded-key geometry with its bending fixture were mine, and a teammate and I shared the CAD and drawings. In the PVT build I ran the key and the mount production while two teammates ran the silicone molding and resin casting. One teammate ran the risk register through 6 revisions and wrote the quality test plan; the teammate I shared CAD with owned the Gantt chart and the packaging concept; a third wrote the BOM and the cost model at every release, tracked the money, and finalized the financial projections.
Concept selection: eight alternatives, one Pugh matrix
We brainstormed around 11 product ideas — a pill sorter, a watch holder, a pet feeder, a charger winder — and sketched a manufacturing strategy and risks for the shortlist before committing to the toothpaste dispenser. The proposal carried seven sketched concepts: two box designs where a rod slides down beside the tube, a vertical roller and a horizontal roller, a foldable hand-crank version, a clicking dispenser that walks down wall pegs, a countertop crank base, and a wall dial with a toothbrush slot.
I authored the Pugh matrix that decided between them, with a teammate helping fill the first version: 9 criteria weighted 1 through 9, customer experience heaviest at 9 and ease of assembly lightest at 1, scored across 8 design alternatives — the sheet scores the two box designs separately. The countertop Crank Base won at 16 points; the wall Dial Mount ranked fifth with 2.
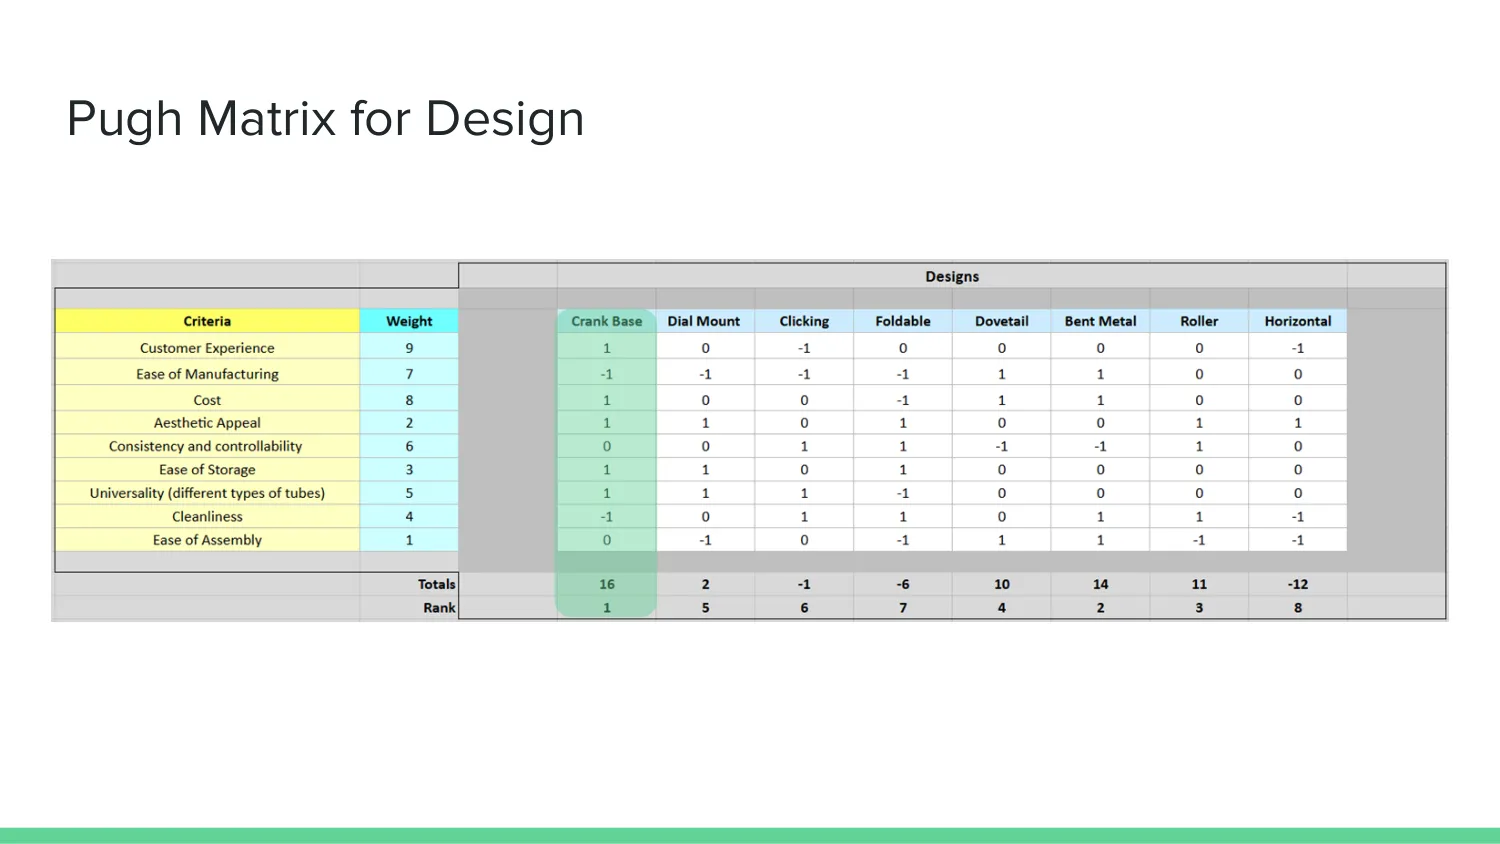
The crank base we ranked first was the same mechanism we shipped — just sitting on a counter, without a wall mount — and the wall dial was a different design entirely. I pushed for taking the best parts of both, and that merge is what we locked in the detailed proposal: the crank base’s turn-key mechanism carried onto a wall mounting. Mounted on the wall, you don’t hold the base while dispensing, and the tube hangs facing downward — exactly the orientation you want when dispensing onto your toothbrush. The dial and the hand crank both got cut along the way — the folded key itself became the handle — and the dial concept’s toothbrush slot survived as a flat shelf on top of the mount, extra storage that was never required.
That left an architecture with no fasteners anywhere. An L-shaped HDPE wall mount goes on the wall with 2 command strips. A triangular base slides onto the mount’s dovetails and holds the wound tube. A folded mild-steel turn key grips the tube end through a slit and doubles as the handle.
The first prototype, A3 in early February, was all 3 components 3D printed in PLA, stuck up with mounting tape, and squeezed a real toothpaste tube.
We had no in-house injection molding for the prototype phases, and the A3 report says so flat out. So each part got a prototype process chosen to stand in for its production one: the mount CNC-milled from HDPE, the base cast in resin from a silicone mold explicitly “to simulate the process of injection molding” planned for mass production, and the key waterjet-cut from mild steel and bent in fixtures. All seven sketches and the named risks are in the design sketches and detailed proposal.
The quality test plan: 15 tests on 1, 3, then 10 units
A teammate’s quality test plan pinned 15 tests to the spec, each with acceptance criteria and a severity level, run on 1 unit at EVT, 3 at DVT, and 10 at PVT.
| Requirement | Target | Achieved | Verified by |
|---|---|---|---|
| Stay wall-mounted through use | more than 2 full days incl. 10 uses before and after the 24-h mark | EVT not tested — never mounted; DVT and PVT pass | Quality test 1.01 |
| Base and mount stay attached | no separation, loosening, or cracking after 10 consecutive uses | EVT fail; DVT and PVT pass | Test 1.02 |
| Survive a drop | 6 ft onto hard floor, no cracks or breaks | EVT pass; DVT fail — base shattered; PVT pass | Test 1.03 |
| Withstand cleaning | 3 Lysol wipe-downs, no visible damage | pass at all phases | Test 1.04 |
| Withstand bathroom steam | 20 min of steam, stays mounted and usable | EVT fail — never mounted; DVT and PVT pass | Test 1.05 |
| Novice assembly | 3 minutes or less from the package | pass at all phases | Test 1.06 |
| Dispense like hand-squeezing | within 10% of manual average, 5 trials each | pass at all phases | Test 3.01 |
| Rolled tube fits and holds | full roll-up, no unwind on release | EVT fail — flimsy walls; DVT and PVT pass | Test 3.03 |
| Work across tube brands | at least 80% of tested common tubes | 4 of 5 types — 80% | Test 3.04 |
| Key slot retains loaded key | still for 2 min under light disturbance | EVT fail; DVT and PVT pass | Test 3.05 |
| Product weight, turn-key force | never set — left as “test A4” in the spec | informally validated — no user had trouble with either | — |
EVT: 8 of 15 failed, 5 to a single cause
EVT was 1 unit, gated 2026-03-03 as the “first functioning product.” The base came out of our first silicone mold, the key got waterjet-cut and bent over jigs, and the mount was milled in 2 CNC operations — dovetails first, then the main body.
8 of the 15 tests failed. Five of the eight traced to a single cause: the assembly was never mounted on a wall, because the command-strip adhesion procedure needs a 3–7 day window nobody had scheduled. Adhesion, base-to-mount separation, steam, tube insertion, and key retention all failed for a unit that never touched a wall. The other three were real part defects: the rolled tube popped out of the base’s flimsy walls, and the base itself had sharp corners and a bubbled surface. The corrective action written into the report: start manufacturing earlier and budget real time for testing. At DVT we mounted the device per the assembly SOP — press firmly and peel the film after 2–3 minutes, then wait 60 minutes before sliding the loaded base on — and every mount-dependent test flipped to pass. The rest is in the EVT report.
The resin cure: 72 hours against a 10-hour datasheet
The EVT bases also came out soft and deformed, and this one took real debugging. We had followed the bottle: fast-cure resin, demolding “allowed” at the 4-hour mark — and the parts deformed on the way out of the mold. The first guess was that we were simply demolding early, so we waited longer, and what we found was worse: our resin took 72 hours to fully harden, versus the 10 hours stated on the bottle. The same resin’s working time was too short to degas before it gelled, so bubbles were baked in from the start. The corrective action was a material change plus process discipline — we abandoned the LET’S RESIN fast-cure for Alumilite Clear Slow at $104.49 a set, and we stopped demolding before full cure. DVT and PVT bases held their shape.
We treated resin selection as critical after that — cure time set our prototype pace, and stiffness decided whether the base could hold a wound tube. Shock absorption mattered too, for the drop test, and the choice ended up driving wall-thickness increases in pretty much every part of the base.
Bubbles were the other half of the fight. DVT found that having two runner holes causes bubbles to form, so the mold went to one big runner. The slower resin bought enough working time to vacuum-degas each pour for 90 seconds. Deep bubbles still persisted in the dovetail features at PVT, so the pour became two-stage: fill the bottom half of the mold and pop its bubbles with a syringe, then complete the fill, with the resin pre-warmed in a hot-water bath to thin it. The PVT paint-finish test then passed on all 10 units.
DVT: the drop test shattered the base
DVT ran the 15 tests on 3 samples and passed 13 — the paint finish failed on bubbles in the base, and the drop test failed outright: “the base was too brittle and shattered.” The fracture sat near the dovetails, and the diagnosis was that the wall between the arch and the bottom of the dovetail was too thin. The corrective action was tooling-side: cut the silicone mold to make the base thicker there. That was the second thickening of the project — DVT had already added thicker walls and more structural support after the rolled tube popped out of the flimsy EVT walls. At PVT the 6-ft drop passed on all 10 units. The details are in the DVT report.
Bending the turn key
The key went through more generations than any other part, and most of them were mine. The A3 key was PLA and too weak. Flat waterjet steel was still too flimsy, so I moved it to a curved design and designed a bending fixture to achieve the shape — modeled explicitly on the commercial Davids metal tube squeezer.
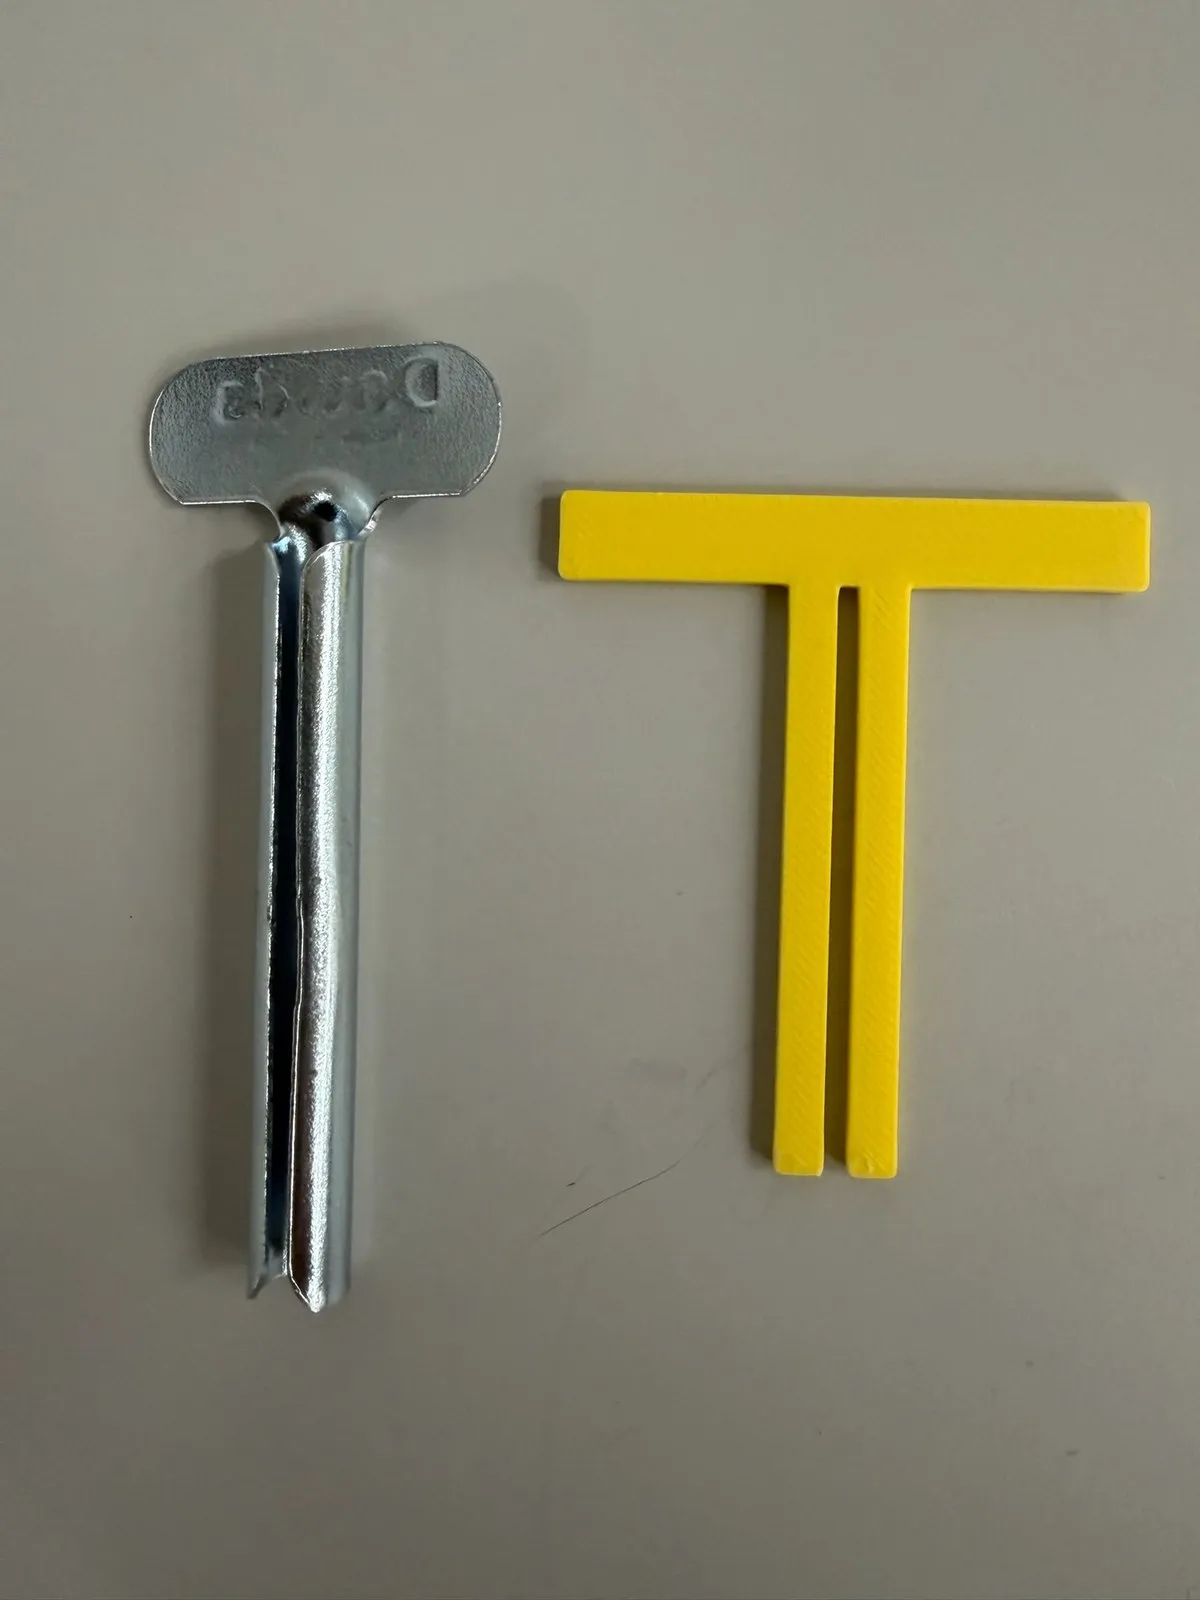
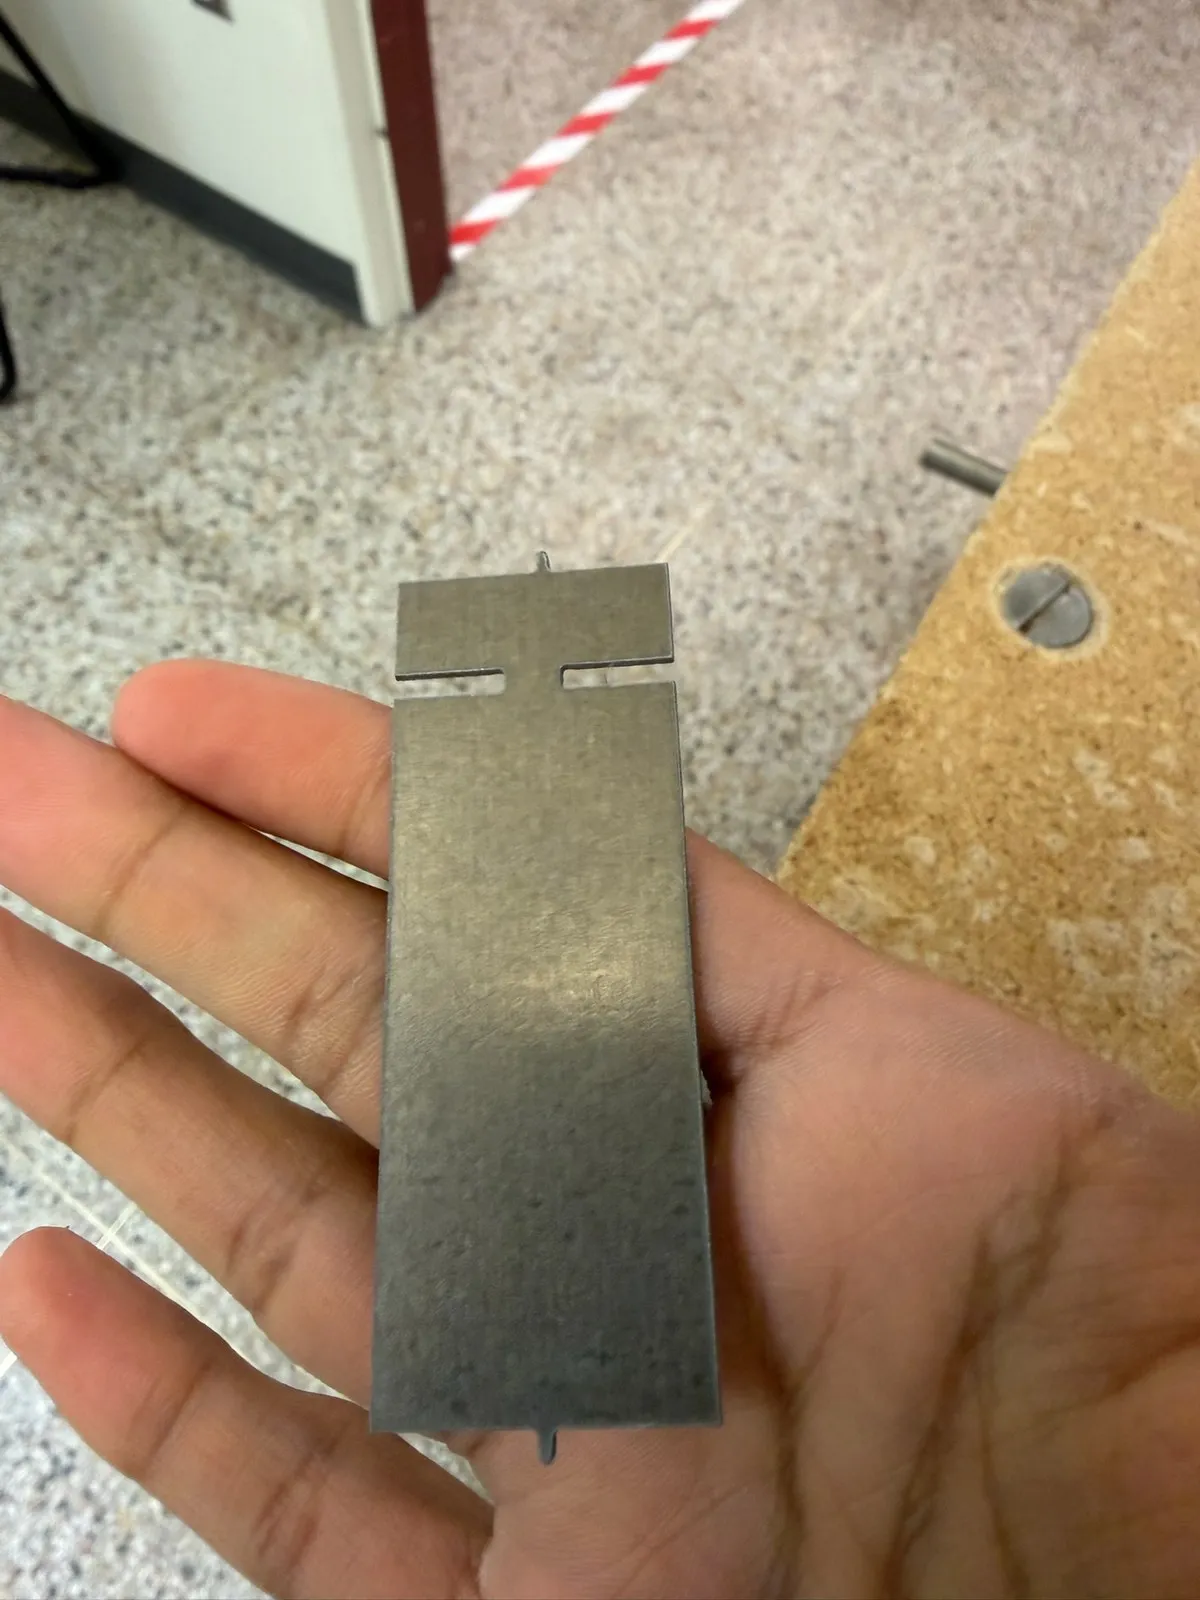
In the fixture, the key blank wasn’t large enough to achieve the intended bend radius, so instead of a cylinder curl I got two faces bent toward each other — a triangle profile with a slit down the middle, the tips ending 1 mm apart to grip the tube end. I judged that shape perfectly valid for the use case and ran with it rather than redesigning the fixture again. The EVT jig got scrapped (“need new bending fixture”); by PVT the fold happened in a 3D-printed fixture under an arbor press, and the control plan’s reaction to a broken fixture was to reprint it at higher infill. The triangle fold passed the rotation and dispensing tests at DVT and PVT, and the MP plan carries the exact same fold onto a stamping line, executed by two pick-and-place robots.
The dovetail depth problem
Dimensional fit of the mating parts was the top risk on the register — 16-critical, my name on it alongside a teammate’s — and it turned into the biggest labor sink of the whole build. On the mount side, the CNC dovetail cutter physically couldn’t cut the slots full length; the dovetails did not go all the way through, and finishing them took a creative machining process — a 2D contour pass for the stock the bit couldn’t reach, then Dremel work with a conical bit to carry the slots to the back wall. On the base side, the resin dovetails needed lots of Dremel post-processing, repeatedly re-checking the tool angle to avoid warping the dovetail. The control plan’s acceptance for the joint was a flush fit on the front view of the assembled product, and its reaction was to continue filing until flush without shaving the bottom edge of the slot. Tabs added to the base and mount made the fit click into place — the dovetail resists both slide-out and vertical motion. The PVT report names incremental fit testing between mating parts as its key learning moment, after the dovetail post-processing spiraled.
PVT: 27 pours and 6 molds for 10 good units
PVT delivered 10 units by 2026-04-16, and all 15 tests passed on all 10. Getting there took 27 resin pours and 6 silicone molds — the BOM logs 3 pours as failed, mold 4 with a messed-up runner, and mold 5 torn. That yield is the one item the register never closed: silicone molding, “wasting money for failed molds,” still marked Open at the final revision. The other 22 items closed. The cost model carries the same story as scrap-rate assumptions: 0.5 at EVT, 0.3 at DVT, 0.25 at PVT, and 0.05 assumed at MP.
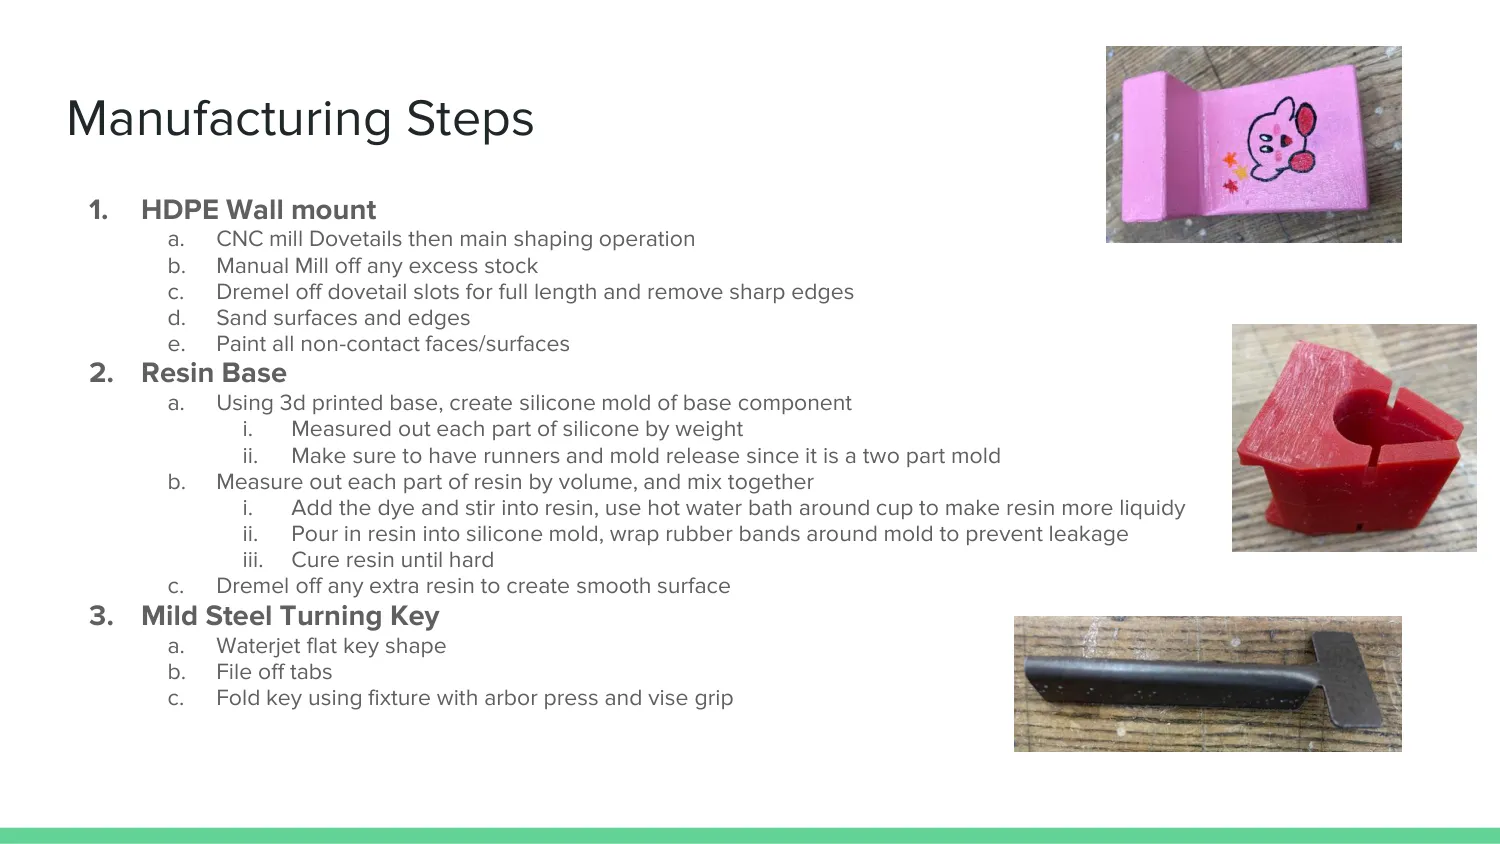
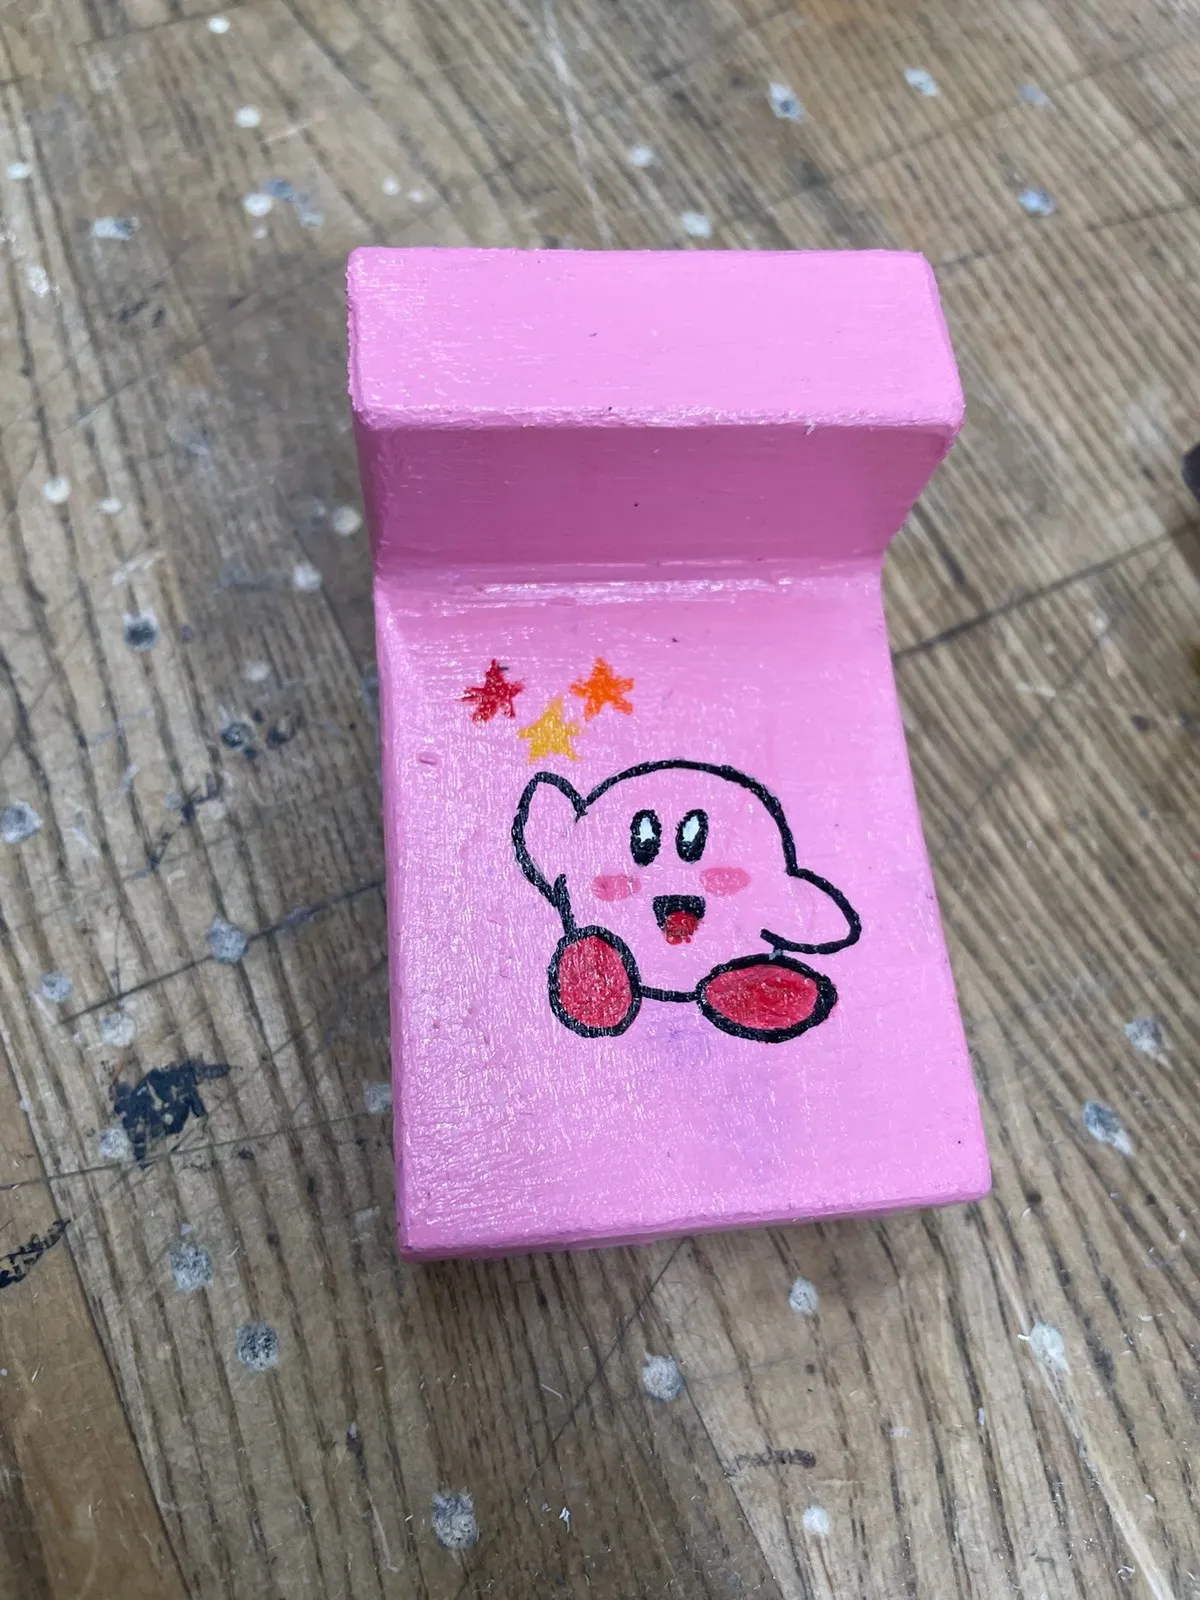
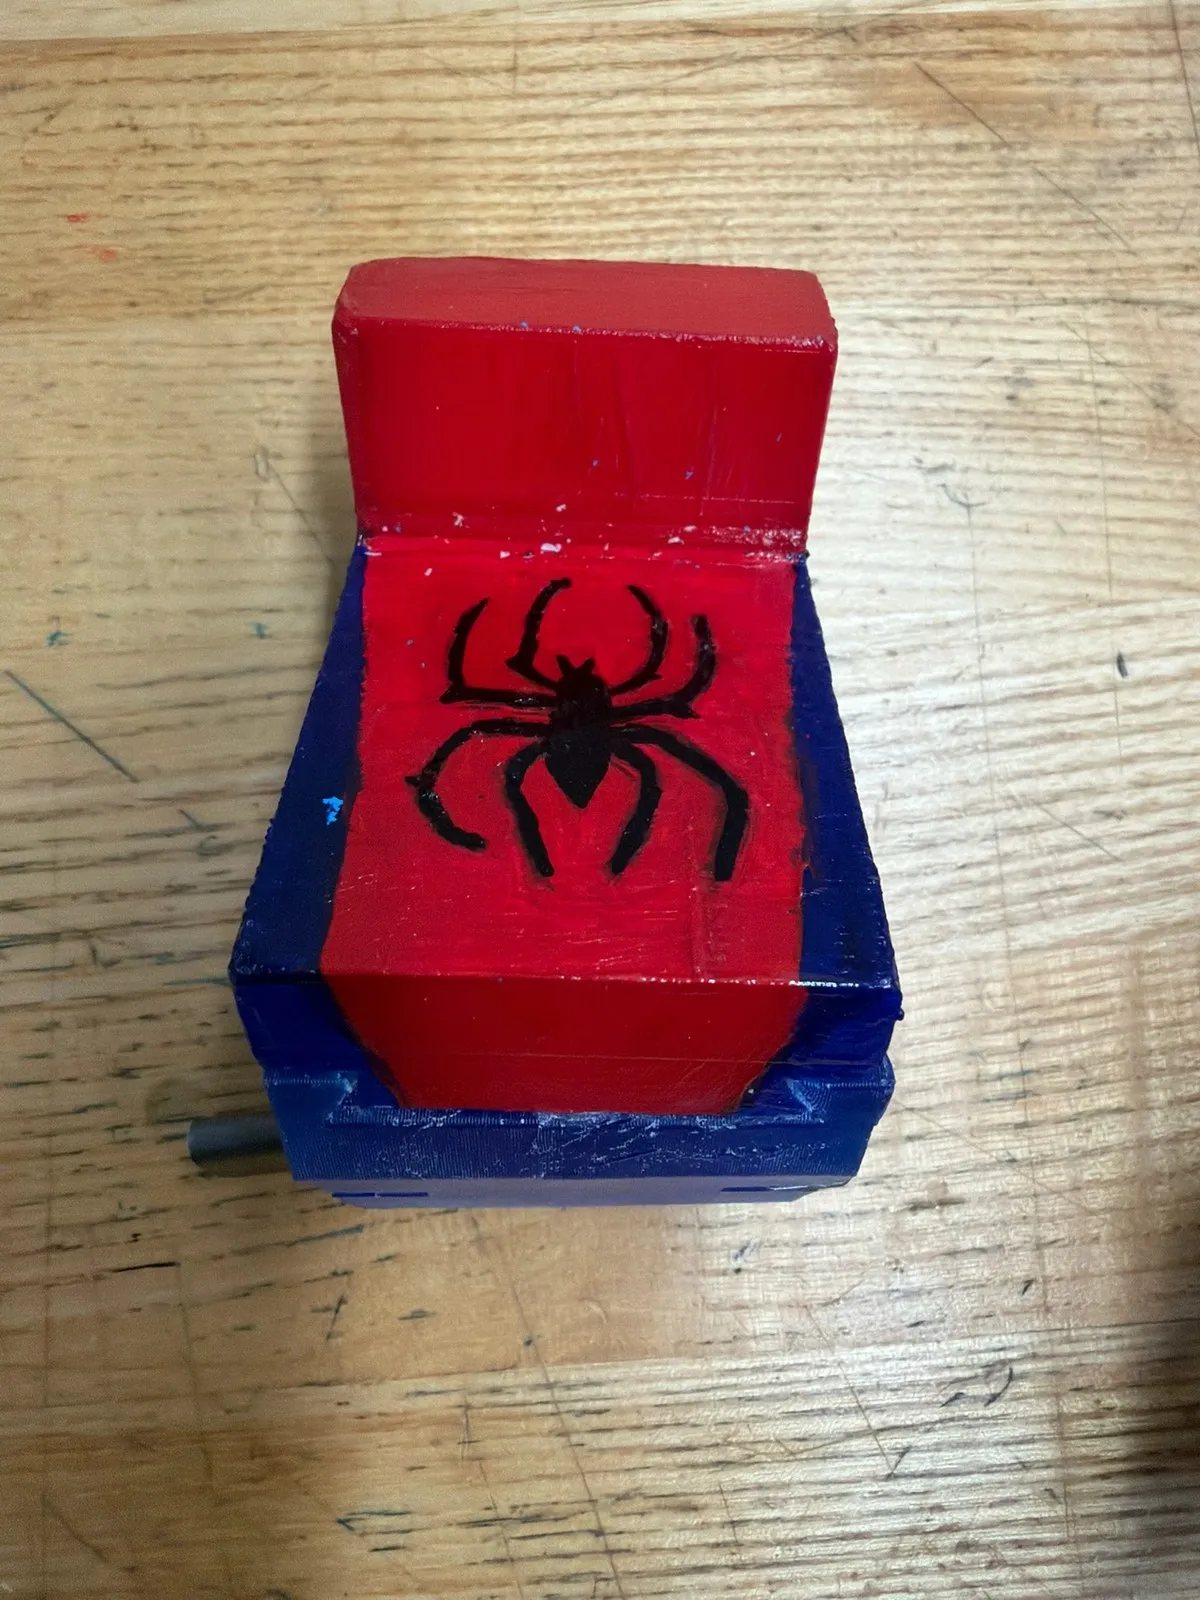
The per-unit recipe was long. Each mount: CNC dovetails, the main shaping op, manual milling of the excess stock, Dremel to full slot length, sanding at 120 then 340 grit, then paint on the non-contact faces only — paint at the sliding contact had chipped, so contact faces stayed bare and painted ones got sealed with Mod Podge. Each key: waterjet with multiple cutouts nested per sheet, then file the tabs off and fold in the fixture. Each base: silicone weighed out per mold part, resin mixed by volume with dye and warmed in the hot-water bath, pour, rubber-band the mold against leaks, cure, Dremel the flash. Finish was hand art at this scale — the DVT set went blue with flowers, and a PVT mount went pink with a hand-drawn Kirby — exactly the operation the MP plan replaces with a pad print.
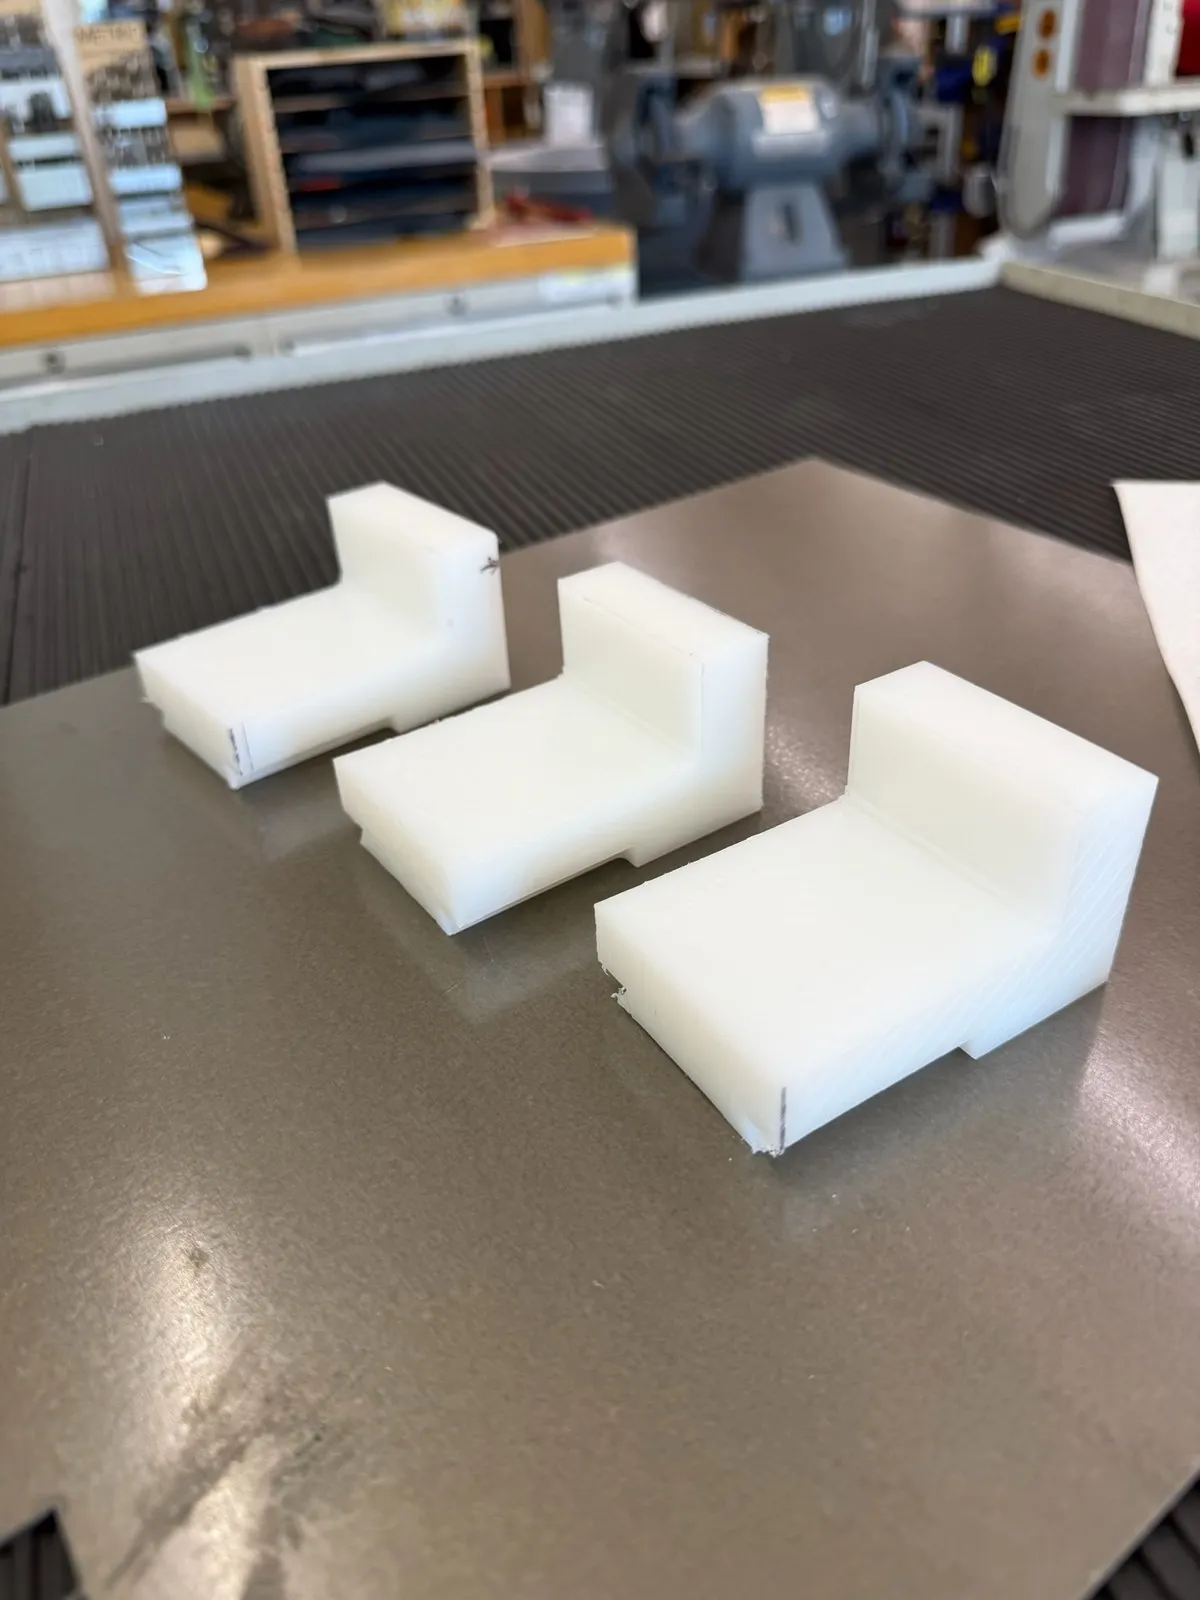
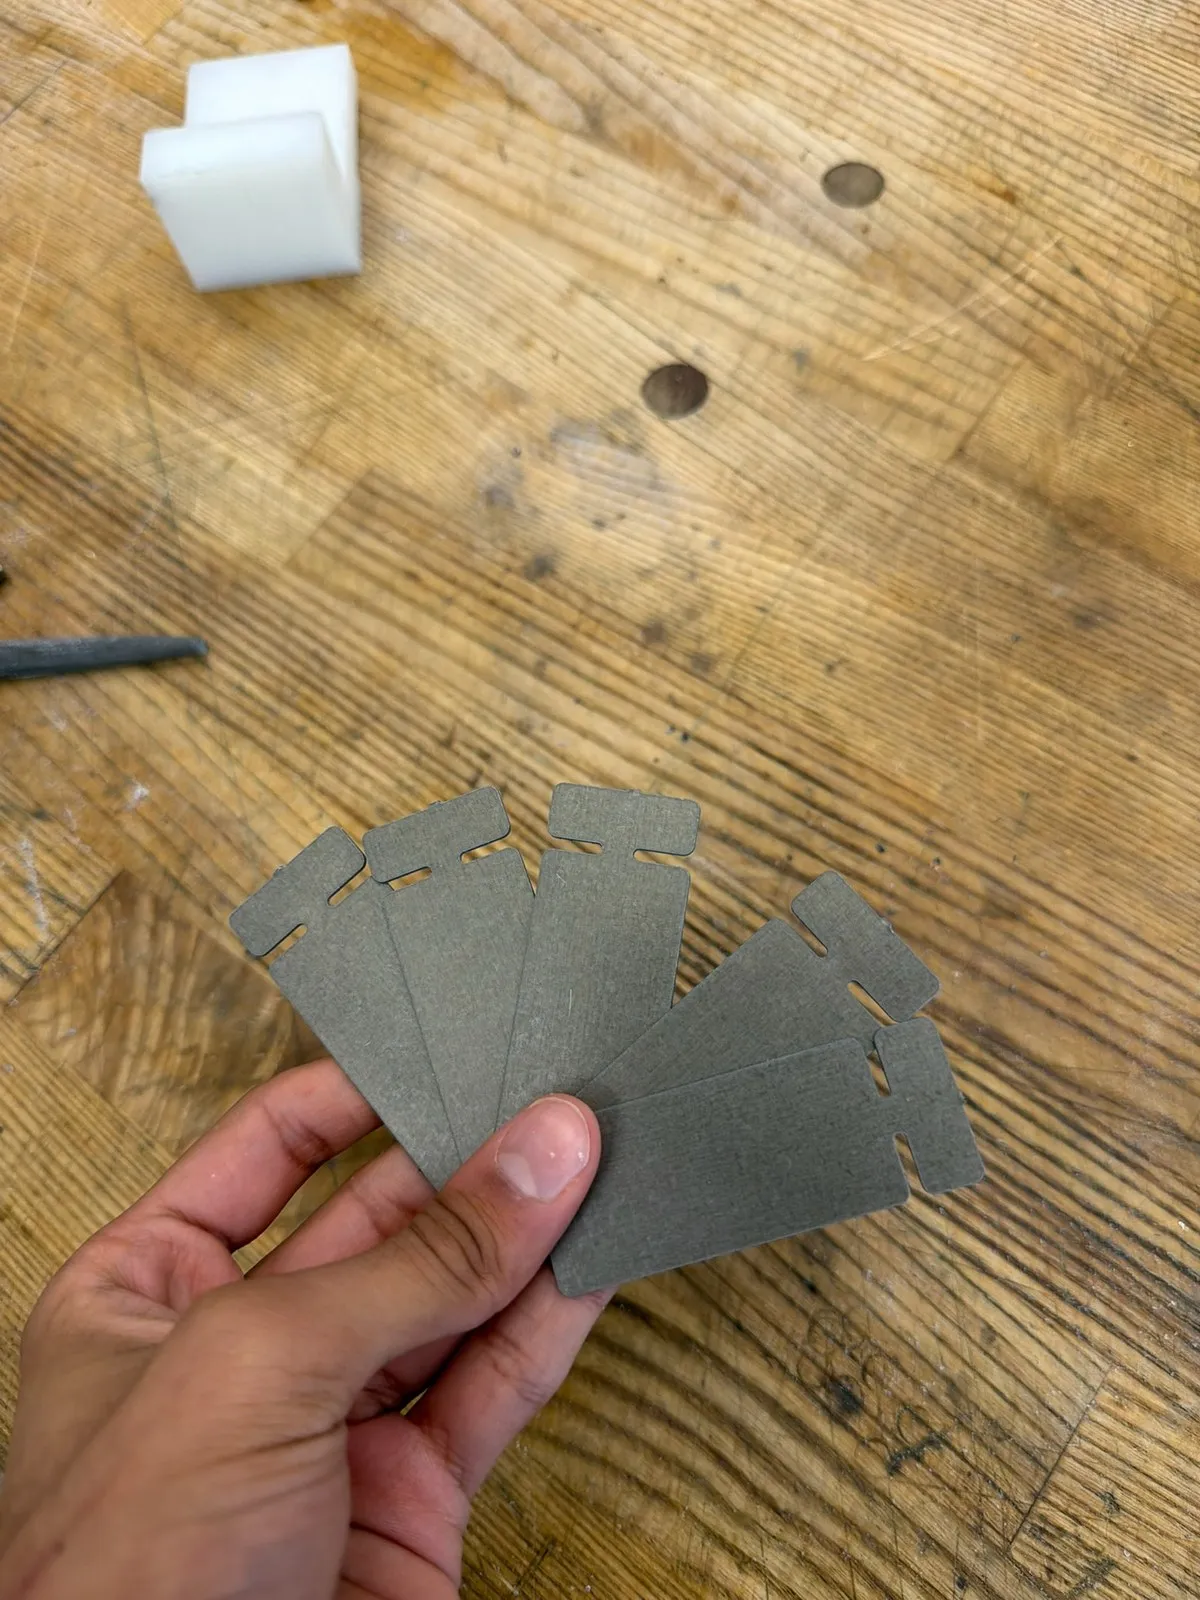
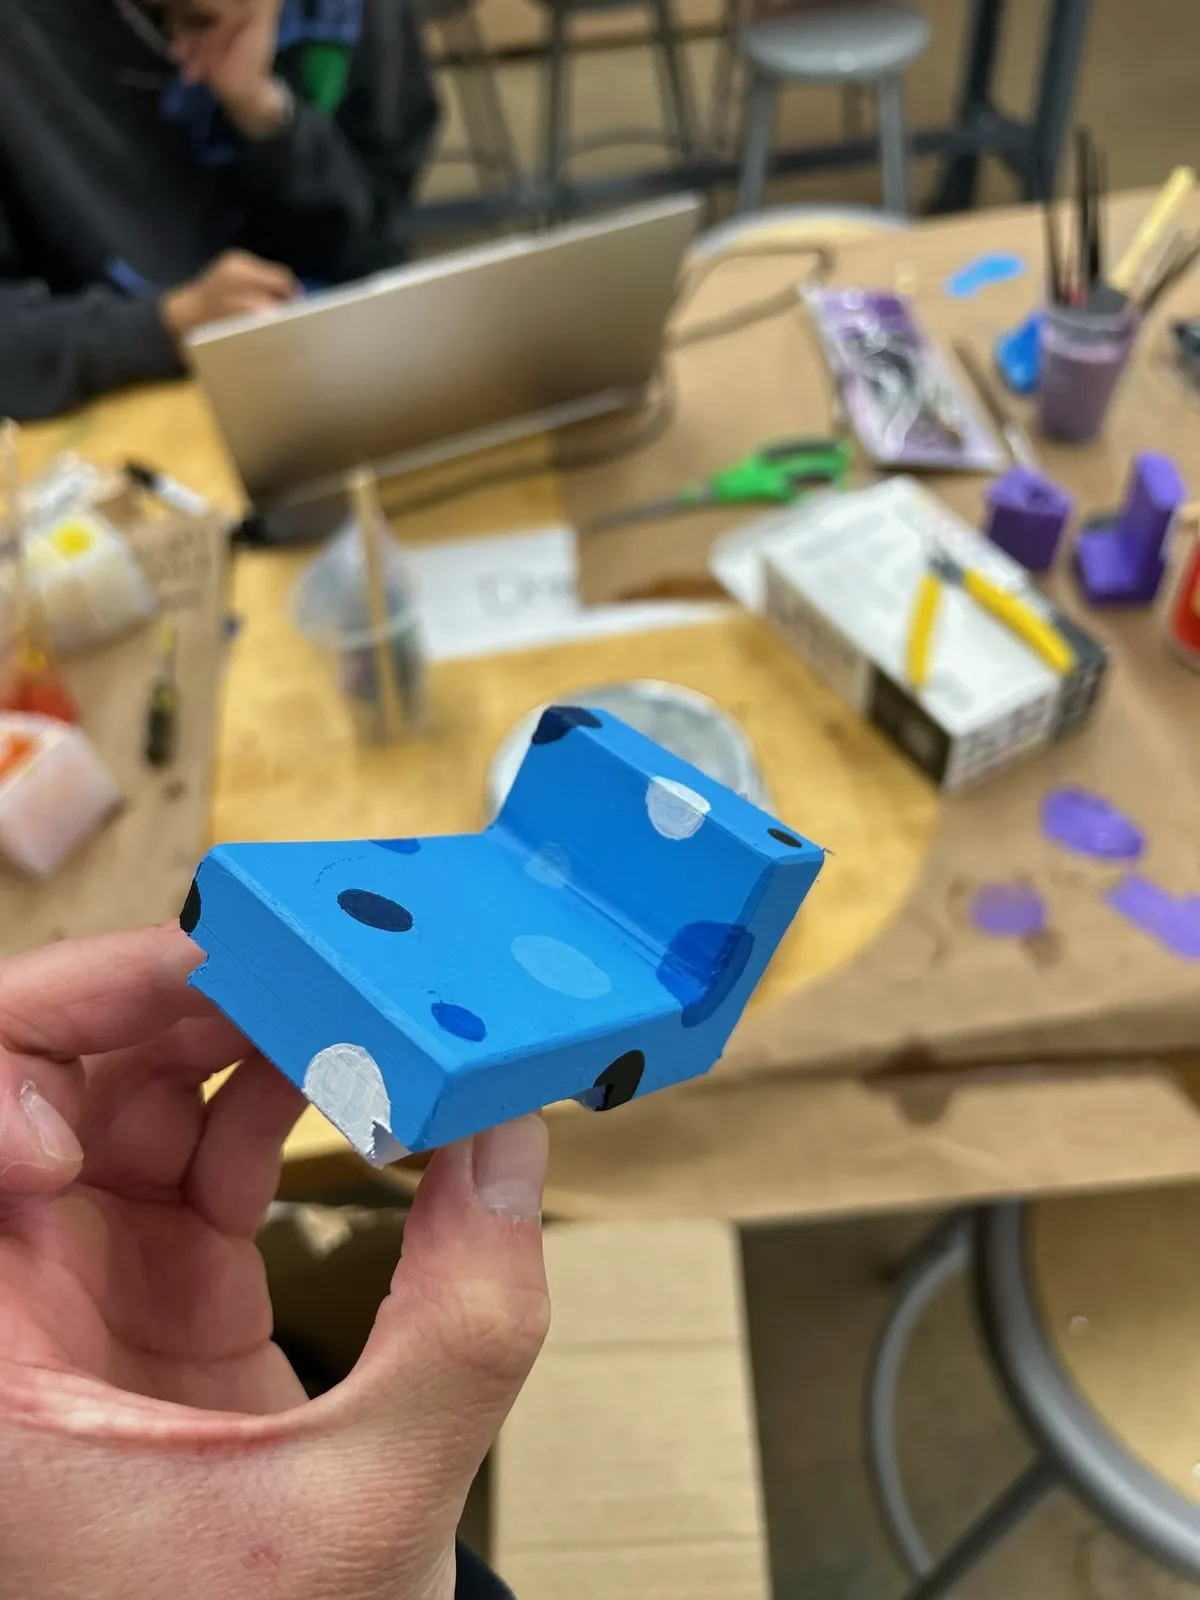
The 10 units coming out identical was the actual point of the phase — validating that the product was repeatable, manufacturable, and scalable. Around 15 people tried the dispenser along the way — classmates and the professor.
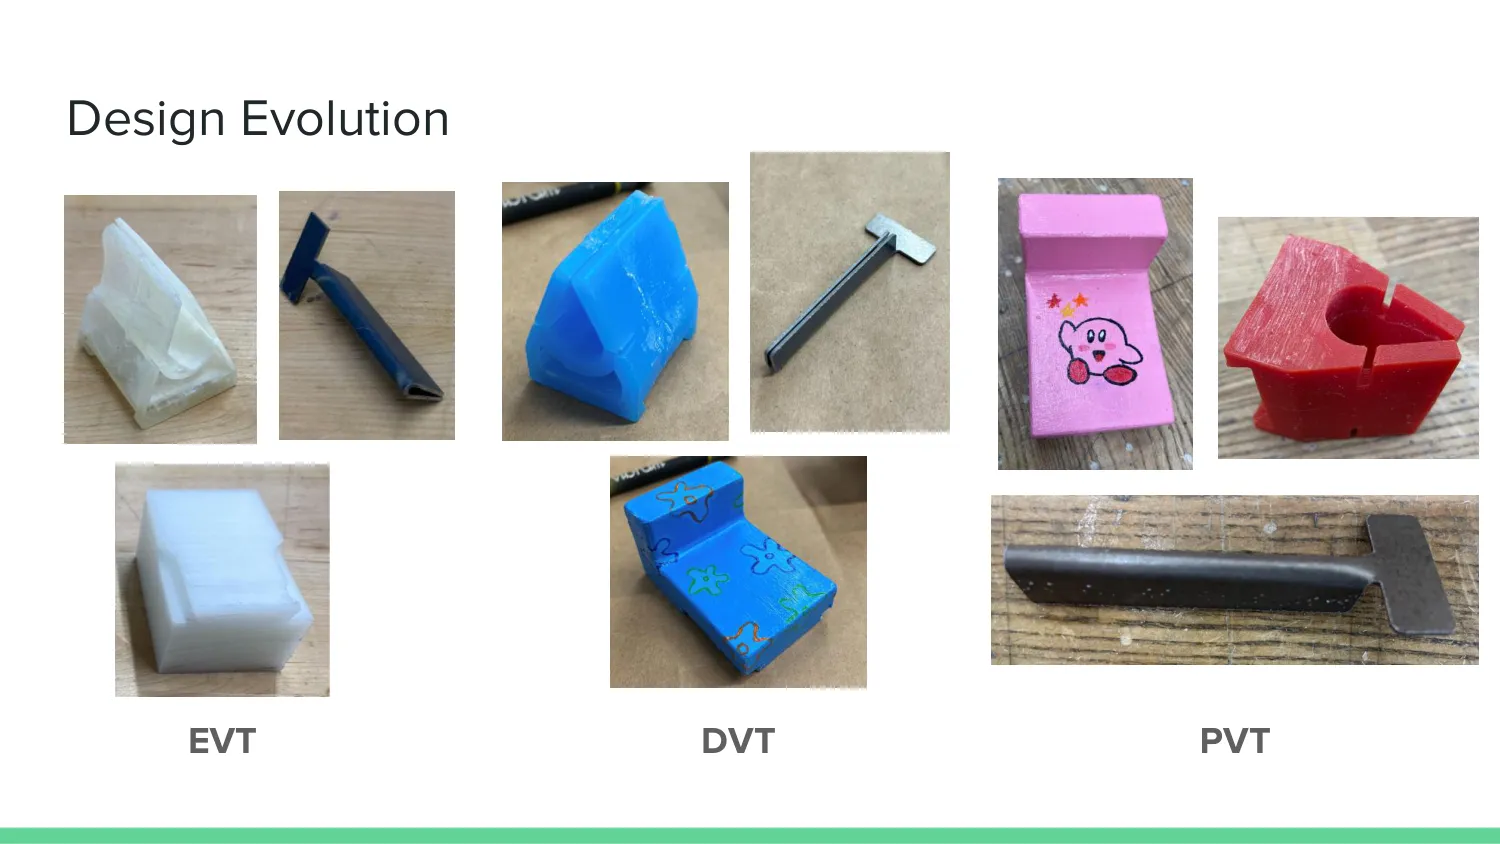
All of it is in the PVT report.
The drawing package: D0001, D0002, D0008
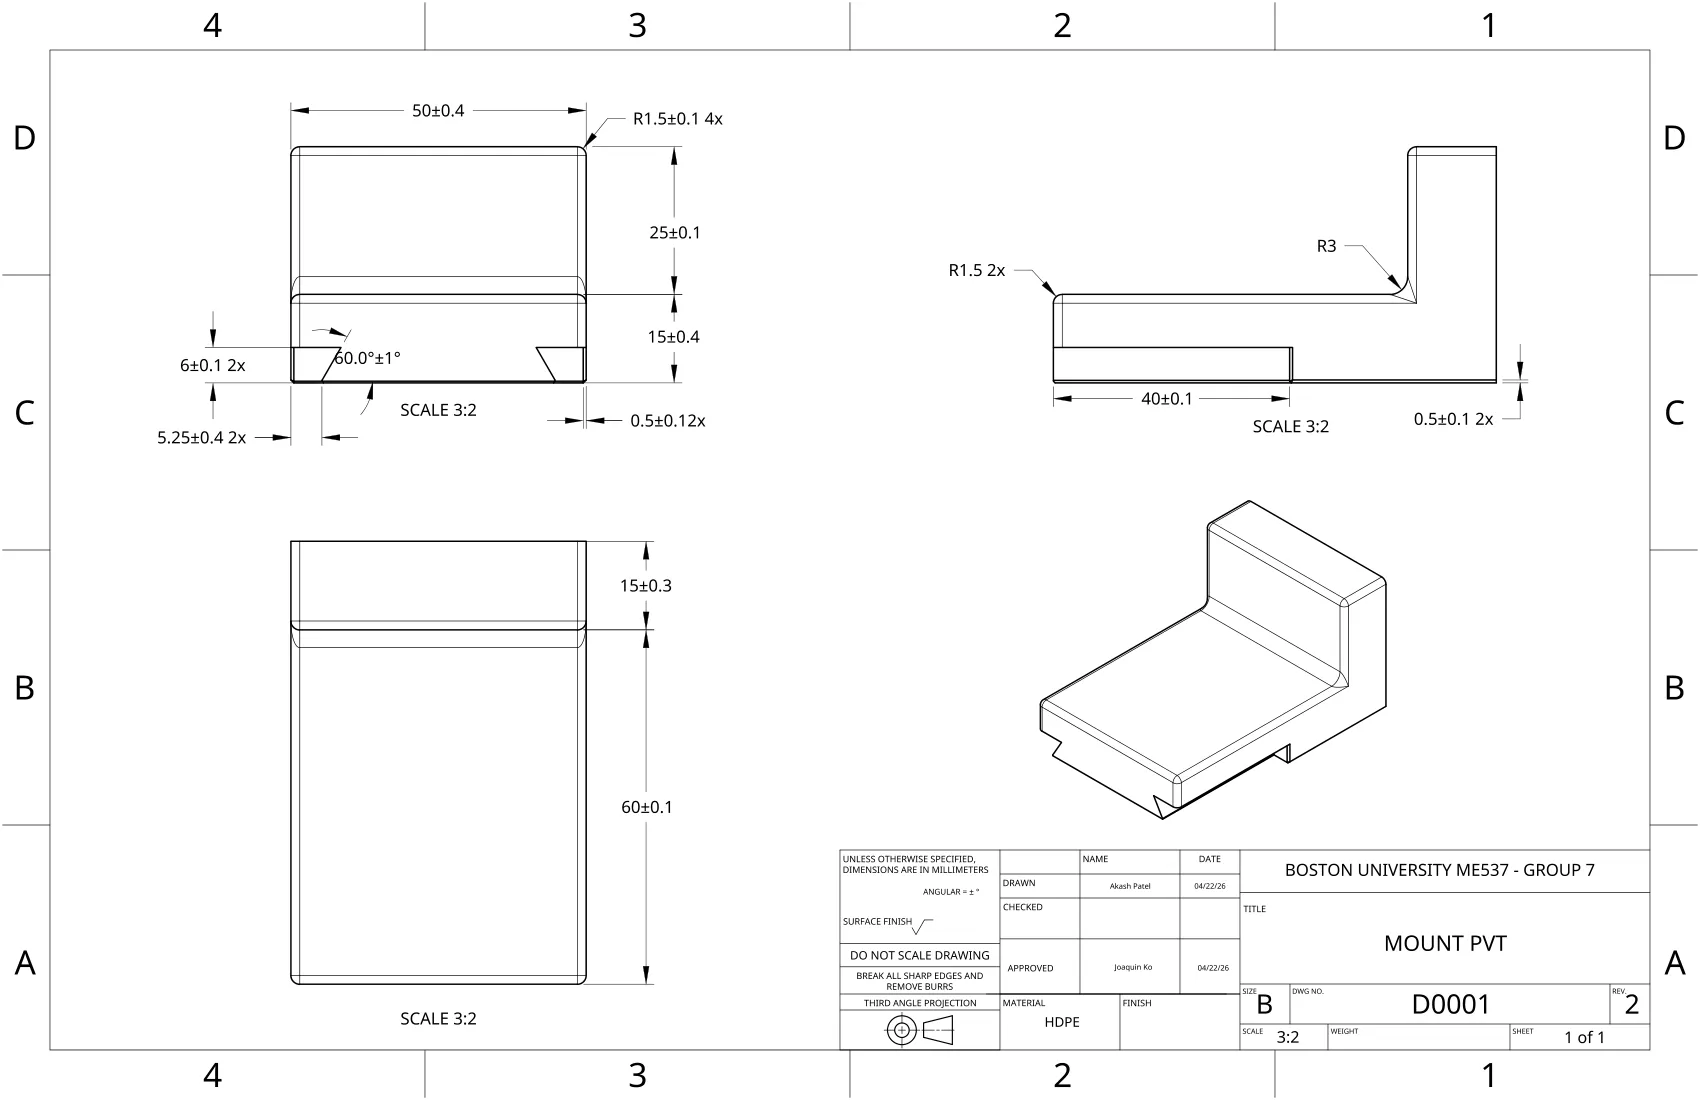
The component drawing package V5 runs 8 B-size sheets, third-angle, in millimeters, covering the PVT parts and the MP tooling. I drew the mount, D0001: HDPE, dovetail angle 60.0° ± 1°, dovetail features at 6 ± 0.1 mm and 5.25 ± 0.4 mm, R1.5 fillets at the corners — drawn 04/22/26, approved by a teammate.
I drew the base the same day, D0002: Smooth-Cast resin, 50.19 mm tall, an R9 tube opening, walls and slots at 0.5 ± 0.1 mm. For the tooling the roles flipped — a teammate drew “Injection Mold Base A,” D0008, a 100 × 80 × 40 mm two-part aluminum clamshell with 10 mm guide-pin holes, and I approved it on 04/30/26. The full set is in the component drawing package, all 8 sheets.
Converting every process for mass production
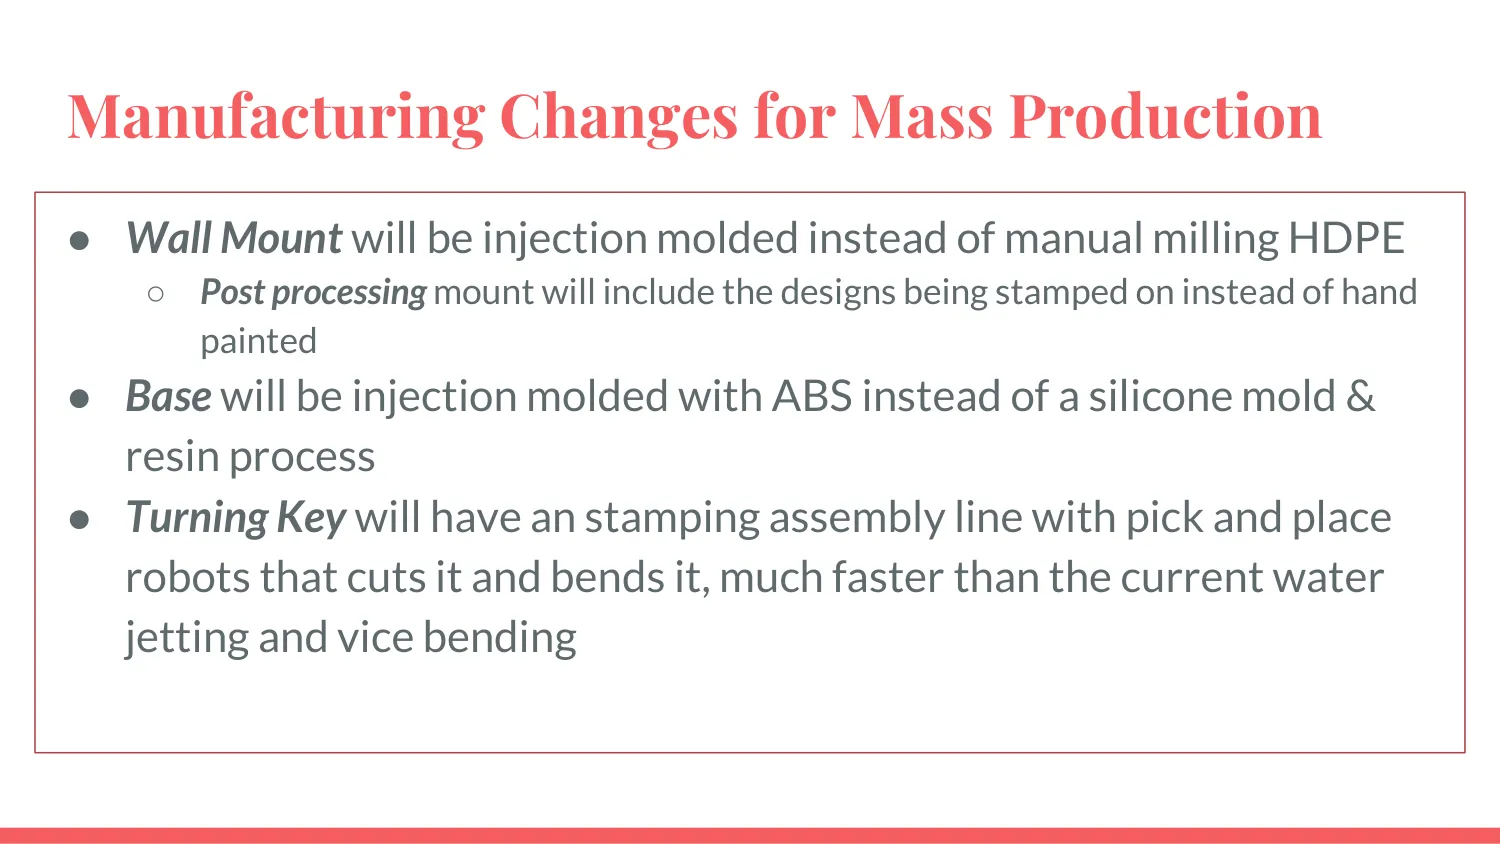
The MP plan re-plans each part for volume. The mount goes from manual milling to injection-molded HDPE; the hand paint becomes a pad print; the base goes from silicone-mold resin casting to injection-molded ABS; my waterjet-and-fold key becomes a stamping line where two pick-and-place robots execute the same folding process we ran by hand.
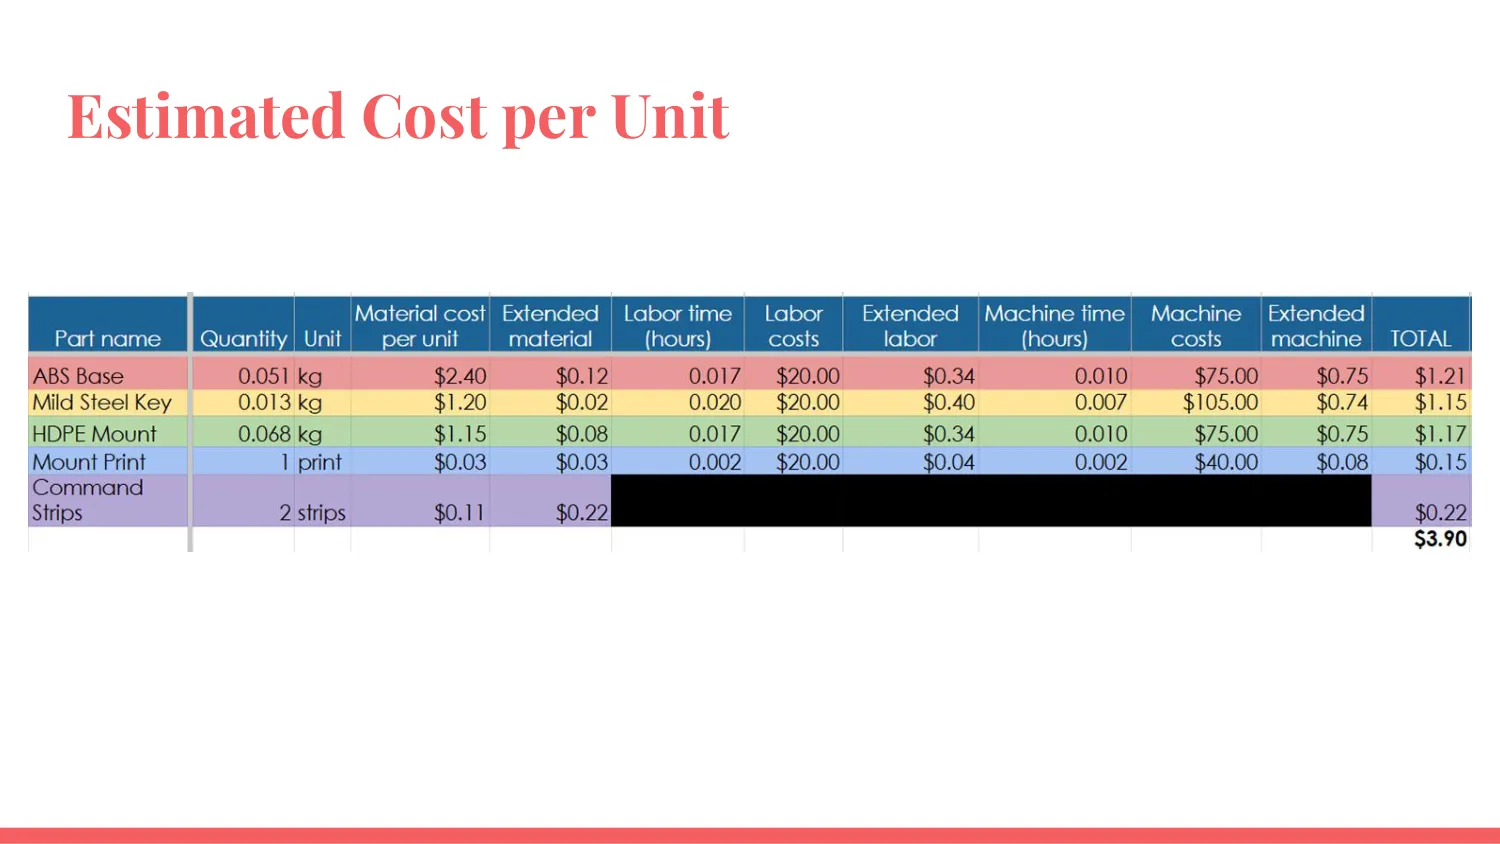
Tooling came to $17,503.70 — $17,500 of tools plus $3.70 of material: the base mold at $5,500, the mount mold at $6,500, the stamp-cut die at $3,500, and the bending die at $2,000, with the pad-print cliché estimated at $300–1,200 on top, machine rates of $75–80/hr, and lead times from 5 days for the dies to 2 weeks for the molds. That $17.5k is what collapses the unit cost: $46.55 a unit hand-built at PVT to $3.90 molded, stamped, and pad-printed — about a 12x reduction. The supplier plan names real vendors with MOQs and lead times: Xometry for both injection-molded parts (MOQ 500, 14-day lead) and for the stamped key (MOQ 1,000, 10-day). Teca-Print USA does the pad printing (MOQ 500, 7-day), and the command strips come from 3M in bulk with a 5-day lead. Packaging landed as a 65.5 × 145 × 58 mm styrofoam-and-cardboard box with a paper quick-start guide, at a $0.12–0.20 per-unit target. The plan itself: the mass-production report.
Unit economics
| Phase | Cost per unit (materials, labor, machine) |
|---|---|
| EVT | $172.94 |
| DVT | $224.95 |
| PVT | $46.55 |
| MP | $3.90 |
The $3.90 covers materials, labor, and machine time at 10,000 units — the presentation’s bottom line, which I reference over the BOM sheet’s superseded $5.41. Stacked on top of it are $1.67 of mold, die, and stamp amortization and $0.70 of packaging; with overhead, shipping and personnel folded in, the all-in lands at $6.97 a unit. Labor is the sharpest scaling contrast: assembly took 40 hours at $20 an hour for the 10 PVT units — 4 hours a unit — against 600 hours per 10,000 units in the MP model, which is 3.6 minutes a unit.
Where the sheets disagreed on the key — the BOM carried $2.66 against the MP report’s $1.51 — the $1.51 stands; the BOM line had assumed a machine rate double the tooling sheet’s.
Against the concept-stage targets, EVT COGS came in at $679.41 versus the $160.88 target — 4.2x over. Tooling went the other way, $17,503.70 estimated against a $120,500 target, and NRE ran about $2,095 through PVT against the $4,000 target, with $110,085.70 estimated at full MP scale. I estimated a retail price of $15–20 against the $6.97 all-in — my own projection of a profitable product at mass-production scale.
The BOM, the cost model, and the finalized financial projections are a teammate’s work at every version; on the money side my piece was the tooling plan, co-authored with two teammates.
What I didn’t measure
- Product weight and turn-key force never got numeric targets — the spec cells still said “test A4” at v1.1 — so their validation was informal: rotation force was judged as “very little force,” and nobody who tried the product had trouble with either.
- The warranty-life cycle targets, 5,000 dovetail slides and 1,000 key turns, were never verified; no cycle or fatigue test exists in the plan.
- The spec’s 40-inch transport drop and 60 kg compression conditions went untested as written — we dropped from 6 ft instead and never ran a compression test.
- Regulatory targets for a US and EU sale — FDA GRAS, CE, IPX4, BPA-free plastics, REACH, Prop 65 — were identified, and none were pursued to certification.
Where it is now
My biggest takeaway was carrying one design end-to-end, from the very beginning stages of concept into more fleshed-out design into mass production. The most important lesson was the scalability of manufacturing processes, which I would have learned regardless of what the product actually was. If I started over tomorrow, I would try to make something more complicated, something that had moving parts. The decision I’m proudest of is taking ownership of the design of a large portion of the project, and of what it would take to scale it.
I still have one that I use right now. I think it is very, very fun and definitely very easy to use.
Gallery